---
title: How to Get Started with the Dataslayer Power BI Connector
description: Learn how to install the Dataslayer Power BI connector, create queries, load marketing data into Power BI Desktop, and configure scheduled refreshes.
---
[Skip to content](https://support.dataslayer.ai/getting-started-with-dataslayer-power-bi-connector#main-content)
- [English](https://support.dataslayer.ai/getting-started-with-dataslayer-power-bi-connector)
- [Español](https://support.dataslayer.ai/es/getting-started-with-dataslayer-power-bi-connector)
English
Show submenu for translations
[](https://www.dataslayer.ai/)
Open main navigation
Close main navigation
- - [English](https://support.dataslayer.ai/getting-started-with-dataslayer-power-bi-connector)
- [Español](https://support.dataslayer.ai/es/getting-started-with-dataslayer-power-bi-connector)
English
Show submenu for translations
Hello. How can we help you?
- There are no suggestions because the search field is empty.
1. [Knowledge base](https://support.dataslayer.ai/?hsLang=en)
2. [Power BI](https://support.dataslayer.ai/power-bi?hsLang=en)
September 24, 2026
# How to Get Started with the Dataslayer Power BI Connector
## Learn how to install the Dataslayer Power BI connector, create a query, load marketing data into Power BI Desktop, and set up scheduled refreshes.
### Before You Start
The Dataslayer Power BI connector lets you load marketing data from advertising, analytics, CRM, and ecommerce platforms into Power BI Desktop. In this guide, you’ll learn how to install the connector, create and save a query in Dataslayer, load the data into Power BI, customize the query, and configure scheduled refreshes.
#### What You Need
Before you begin, make sure you have:
- A Dataslayer account with access to the Power BI destination.
- Power BI Desktop installed on your computer.
- Access to the advertising, analytics, CRM or ecommerce platform you want to connect.
- The permissions required to authorize Dataslayer and access the source data.
- A clear idea of the accounts, date range, metrics and dimensions you want to load into Power BI.
### Install the Dataslayer Power BI Connector
#### Open the Power BI Destination in Dataslayer
1. Log in to [Dataslayer](https://app.dataslayer.ai/).
2. Open the **Power BI** destination.
-1.png?width=670&height=246&name=Browser%20template%20(18)-1.png)
3. Review the available options for creating queries or connecting Power BI.
#### Download the Dataslayer connector
1. Click **Connect to Power BI**.
-1.png?width=670&height=246&name=Browser%20template%20(19)-1.png)
2. Download the **Dataslayer.mez** file.
-1.png?width=670&height=246&name=Browser%20template%20(20)-1.png)
The **.mez** file is the custom connector that allows Power BI Desktop to access your saved Dataslayer queries.
#### Add the connector to Power BI Desktop
1. Close Power BI Desktop if it is open.
2. Open your Documents folder and go to `Power BI Desktop\Custom Connectors`.
3. **If the folders do not exist, create them manually.
-1.png?width=670&height=246&name=Browser%20template%20(21)-1.png)**
4. Copy the downloaded **Dataslayer.mez** file into the **Custom Connectors** folder.
The usual folder location is:
`[Documents]\Power BI Desktop\Custom Connectors`
#### Allow the connector to load in Power BI Desktop
1. Open Power BI Desktop.
2. Go to **File \> Options and settings \> Options \> Security**.
3. Find the **Data Extensions** setting.
4. Select **Allow any extension to load without validation or warning**.
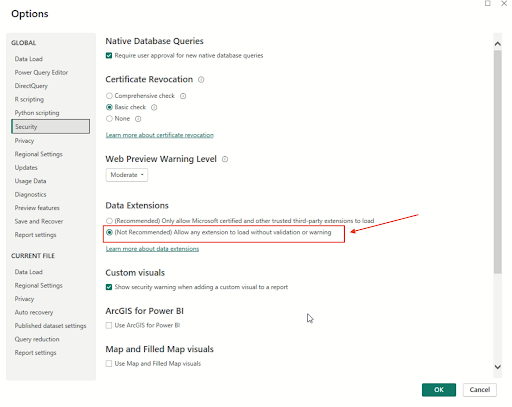
5. Click **OK** and restart Power BI Desktop.
### Create Your First Dataslayer Query
#### Open the Power BI query builder
1. Log in to [Dataslayer](https://app.dataslayer.ai/).
2. Open the **Power BI** destination.
3. Click **New query**.
-1.png?width=670&height=246&name=Browser%20template%20(22)-1.png)
#### Select the account and data source
1. Select the data source you want to use.
2. Select the hub account and the account you want to connect.
3. If required, click **Manage Hub Accounts** to add or authorize another account.
-1.png?width=670&height=246&name=Browser%20template%20(23)-1.png)
4. Authorize Dataslayer if the platform requests permission.
Dataslayer supports multiple marketing data sources, including advertising, analytics, CRM and ecommerce platforms. The available sources depend on your account and plan.
#### Configure the data
Select the data that you want to load into Power BI:
1. Choose the date range.
2. Select the metrics you want to measure.
-1.png?width=670&height=246&name=Browser%20template%20(24)-1.png)
3. Select the dimensions you want to use to group the data.
4. Add filters and options if needed.
Start with one account and a short date range while testing the connection. You can expand the query after you confirm that the data is loading correctly.
#### Save the query as a template
If you plan to reuse the same configuration, you can save the query as a Dataslayer template. Templates help you create future queries without selecting every field manually.
1. Review the selected metrics, dimensions, filters and options.
2. Choose the option to save the configuration as a template.
3. Enter a name that makes the template easy to identify.
For more information, see [How the templates feature works in Dataslayer](https://support.dataslayer.ai/understanding-the-templates-feature-in-dataslayer-for-bigquery-and-api-query-manager?hsLang=en).
#### Name and save the query
1. Enter a query name.
2. Check that the time zone is correct.
3. Save the query.
-1.png?width=670&height=246&name=Browser%20template%20(25)-1.png)
Your saved query will be available when you connect the Dataslayer Power BI connector from Power BI Desktop.
### Load Dataslayer Data into Power BI
#### Connect to Dataslayer from Power BI Desktop
1. Open Power BI Desktop.
2. Click **Get data from another source**.
3. Search for **Dataslayer**.
4. Select the Dataslayer connector and click **Connect**.

If Dataslayer does not appear in the list, check that the **Dataslayer.mez** file is in the correct **Custom Connectors** folder and that the Data Extensions security setting is enabled.
#### Select a saved query
1. Choose the Dataslayer account if Power BI asks you to sign in.
2. Select the saved query you want to use.
3. Review the data preview.
4. Click **Load** to import the data into your Power BI report.
### Customize Dataslayer Data in Power BI
If you already have a saved query, you can adjust some settings directly in Power BI before loading the data.

#### Available customization options
1. **Connection and account:** select a connected account from the available options.
2. **Date range:** expand or reduce the period covered by the query.
3. **Metrics:** add metrics to the saved query.
4. **Dimensions:** add dimensions to group the data.
#### Apply the changes
1. Select the changes you want to make.
2. Click **Apply**.
3. Review the updated preview.
4. Click **Load** to use the data in your report.
For advanced changes such as filters or additional options, edit the query from the Dataslayer website. See [Customizing Dataslayer data directly in Power BI](https://support.dataslayer.ai/customizing-dataslayer-data-directly-in-power-bi?hsLang=en) for more information.
### Set Up Scheduled Refreshes in Power BI
Power BI Desktop and Power BI Service use different refresh workflows. You can build and test the query in Power BI Desktop, then configure scheduled refreshes in Power BI Service when your report is published.
#### Configure the refresh environment
Because Dataslayer uses a custom connector, the connector and its data source must also be available in the environment used for the refresh. Depending on your setup, this may require an On-premises data gateway.
1. Install the On-premises data gateway on a machine that can access the data source.
2. Copy the **Dataslayer.mez** file to the gateway's **Custom Connectors** folder.
3. Restart the gateway service.
4. Configure the Dataslayer data source in Power BI Service.
#### Schedule the refresh
1. Open your workspace in Power BI Service.
2. Select the dataset connected to Dataslayer.
3. Open the dataset settings.
4. Select **Schedule refresh**.
5. Choose the frequency and time for the refresh.
6. Save the configuration and monitor the first refreshes.
For the complete gateway and refresh configuration, see [How to set up scheduled refreshes in Power BI](https://support.dataslayer.ai/how-to-set-up-scheduled-refreshes-in-power-bi?hsLang=en).
### Update the Dataslayer Power BI Connector
Download the latest connector file whenever Dataslayer releases a fix or a new connector feature.
1. Close Power BI Desktop.
2. Log in to Dataslayer and open the **Power BI** destination.
3. Click **Connect to Power BI** and download the newest **Dataslayer.mez** file.
4. Open the **Custom Connectors** folder.
5. Replace the old connector file with the new one.
6. Open Power BI Desktop again.
For more information, see [How to update the Dataslayer Power BI connector](https://support.dataslayer.ai/how-to-update-my-dataslayer-power-bi-connector?hsLang=en).
### Common Power BI Connector Issues
#### Dataslayer does not appear in Power BI
Check that Power BI Desktop is closed when you copy the connector file, that the file is in `[Documents]\Power BI Desktop\Custom Connectors` and that the Data Extensions security setting allows the connector to load. Restart Power BI Desktop after making changes.
#### The connector appears but no queries are available
Confirm that you saved at least one query in the Power BI destination and that you are using the same Dataslayer account. If you recently changed accounts, sign in again with the account that owns the query.
#### Power BI cannot connect to the query
Check the source account permissions, confirm that the query works in Dataslayer and try loading a smaller date range. If the query includes unavailable metrics or dimensions, edit it in Dataslayer and save it again.
#### The Power BI refresh fails
Check the gateway status, confirm that the Dataslayer connector is installed in the gateway's Custom Connectors folder and verify that the credentials are still valid. Review the Power BI refresh history for more information.
#### I need to use another Dataslayer account
Open Power BI Desktop, go to **File \> Options and settings \> Data source settings** and clear the existing Dataslayer permissions. You can then sign in again with the account you want to use. See [How to switch between accounts in Power BI](https://support.dataslayer.ai/how-to-switch-between-accounts-in-power-bi?hsLang=en).
### Frequently Asked Questions
#### What is the Dataslayer Power BI connector?
The Dataslayer Power BI connector is a custom Power BI connector that lets you load saved Dataslayer queries into Power BI Desktop. It can bring data from advertising, analytics, CRM and ecommerce sources into your reports.
#### Do I need Power BI Desktop or Power BI Service?
Use Power BI Desktop to install the connector, create the report and test the query. Use Power BI Service when you need to publish the report and configure scheduled refreshes.
#### Do I need to install the connector before creating a query?
No. You can create and save the query in Dataslayer first, but you must install the connector before loading that query from Power BI Desktop.
#### Can I use API Query Manager with Power BI?
Yes, but API Query Manager is a separate Dataslayer product and workflow. It creates a query URL that you connect through Power BI's Web data source. This guide covers the Dataslayer Power BI connector; for the API workflow, see [How to connect data to Power BI with Dataslayer API](https://support.dataslayer.ai/how-to-connect-data-to-power-bi-via-dataslayer-api?hsLang=en).
#### Can I connect Google Ads, Google Analytics or HubSpot to Power BI?
Yes, if the connector is available in your Dataslayer account. Create a query for the source, select the accounts and fields you need, save it and load it through the Dataslayer Power BI connector.
#### Can I schedule Power BI refreshes?
Yes. After publishing your report to Power BI Service, configure the required gateway and data source settings, then create a scheduled refresh for the dataset.
#### How do I update the Dataslayer Power BI connector?
Download the latest **Dataslayer.mez** file, close Power BI Desktop, replace the existing connector file in the Custom Connectors folder and reopen Power BI Desktop.
### Start Using Dataslayer with Power BI
You can now install the Dataslayer Power BI connector, create your first marketing data query and load it into Power BI Desktop.
For advanced workflows, explore the guides for [customizing Dataslayer data](https://support.dataslayer.ai/customizing-dataslayer-data-directly-in-power-bi?hsLang=en), [scheduled refreshes](https://support.dataslayer.ai/how-to-set-up-scheduled-refreshes-in-power-bi?hsLang=en) and [updating the connector](https://support.dataslayer.ai/how-to-update-my-dataslayer-power-bi-connector?hsLang=en).
If you still have questions, contact us through the live chat on our [website](https://dataslayer.ai/) or by [email](mailto:info@dataslayer.ai). We are happy to help.
- [General](https://support.dataslayer.ai/general?hsLang=en)
- [Billing & Pricing](https://support.dataslayer.ai/billing-pricing?hsLang=en)
- [Data Sources](https://support.dataslayer.ai/data-sources?hsLang=en)
- [Blended Connectors](https://support.dataslayer.ai/blended-connectors?hsLang=en)
- [Google Sheets](https://support.dataslayer.ai/google-sheets?hsLang=en)
- [Microsoft Excel](https://support.dataslayer.ai/microsoft-excel?hsLang=en)
- [Spreadsheets](https://support.dataslayer.ai/spreadsheets?hsLang=en)
- [Looker Studio](https://support.dataslayer.ai/looker-studio?hsLang=en)
- [Big Query](https://support.dataslayer.ai/big-query?hsLang=en)
- [API Query Manager](https://support.dataslayer.ai/api-query-manager?hsLang=en)
- [Power BI](https://support.dataslayer.ai/power-bi?hsLang=en)
- [Amazon S3](https://support.dataslayer.ai/amazon-s3?hsLang=en)
- [Amazon Redshift](https://support.dataslayer.ai/amazon-redshift?hsLang=en)
- [Snowflake](https://support.dataslayer.ai/snowflake?hsLang=en#main-content)
- [Marketplace](https://support.dataslayer.ai/snowflake?hsLang=en#marketplace)
- [Google Cloud Storage](https://support.dataslayer.ai/google-cloud-storage?hsLang=en)
- [Database](https://support.dataslayer.ai/database?hsLang=en)
- [Azure SQL](https://support.dataslayer.ai/azure-sql?hsLang=en)
- [Azure Storage](https://support.dataslayer.ai/azure-storage?hsLang=en)
- [Dataslayer Atlas](https://support.dataslayer.ai/dataslayer-atlas?hsLang=en)
- [Morpheus](https://support.dataslayer.ai/morpheus?hsLang=en)
- [AI Looker Studio Analyzer](https://support.dataslayer.ai/ai-looker-studio-analyzer?hsLang=en)
- [Dataslayer MCP](https://support.dataslayer.ai/dataslayer-mcp?hsLang=en)
- [Dataslayer GPT](https://support.dataslayer.ai/dataslayer-gpt?hsLang=en)
- [Dataslayer AI Chat](https://support.dataslayer.ai/dataslayer-ai-chat?hsLang=en)
[](https://dataslayer.ai/)
Dataslayer.ai: Digital Marketing Reporting Made Easy
Copyright © 2026, DATASLAYER SL