If you already use Dataslayer in Google Sheets, you may have configured queries you’d like to reuse in other Dataslayer web destinations, such as the API Query Manager, BigQuery, Power BI, Amazon Redshift, Amazon S3, or Snowflake.
To avoid rebuilding everything from scratch, Dataslayer offers an automatic query migration feature that lets you replicate those queries in other products with just a few clicks.
Migrating your queries allows you to:
-
Save time by reusing existing query setups.
-
Keep consistency in your reporting logic across tools.
-
Easily scale from spreadsheets to cloud or BI platforms.
How to migrate queries from Google Sheets
1. Open your Google Sheets document
Open the Google Sheet where your Dataslayer queries are already built.

2. Launch the Dataslayer Sidebar
Go to Extensions > Dataslayer > Launch Sidebar.
Your configured queries within the document will be listed in the right side panel.
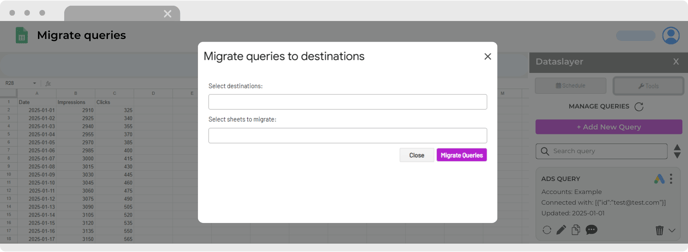
3. Open migration tool
In the sidebar, click the grey “Tools” button. Then, from the dropdown options, select “Migrate queries to another destination” to launch the migration interface.

.png?width=688&height=252&name=Migrate%20queries%20from%20GS%20(1).png)
4. Select your destination(s)
Dataslayer supports migration to the following web destinations:
-
API Query Manager
-
BigQuery
-
Power BI
-
Amazon Redshift
-
Amazon S3
-
Snowflake
- Google Cloud Storage
- Database
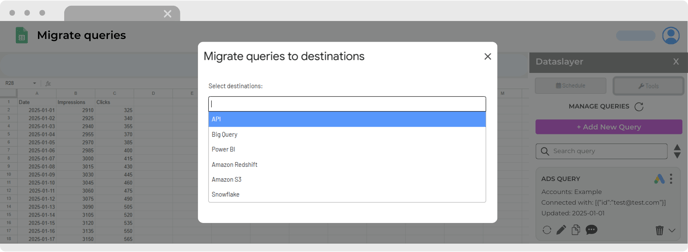
You can select one or multiple destinations to migrate your queries to simultaneously!
5. Select the sheets to migrate
Choose the specific Google Sheets tabs that contain your Dataslayer queries.

You can select multiple sheets at once.
6. Click the Migrate queries button.
The migration will start, and it will take a few moments to complete.

7. Confirmation and link to the migrated query
Once the migration is complete, a confirmation message will appear along with a link to the Dataslayer dashboard, where you can view all your migrated queries. Additionally, a summary will be displayed showing which queries were successfully migrated to each selected destination.

8. Final adjustments
Keep in mind that the queries will be copied but not executed automatically.
You’ll need to run them manually at least once in each destination to complete the setup and load the initial data.
After migration, navigate to each selected destination to review or adjust the migrated queries as needed. For destinations like BigQuery, Amazon S3, Redshift, or Snowflake, be sure to configure the sync frequency for each query to ensure ongoing data updates.
.png?width=688&height=378&name=NEW%20UI%202025%20-%20About%20the%20Hub%20%20refresh%20credentials%20(3).png)
By migrating your queries to Dataslayer’s web destinations, you can standardize and scale your marketing analytics workflows across platforms—without losing time or consistency. Whether you’re moving to BigQuery for large-scale storage, Power BI for dashboarding, or Snowflake for enterprise warehousing, Dataslayer helps you bridge the gap with seamless, one-click migration.
As always, please get in touch with us via our live chat on our website or via email if you still have doubts or questions. We are happy to help!