When using the Snowflake destination in Dataslayer, you need to connect your Snowflake account to send and store data via queries. 
To establish this connection, you’ll be prompted to fill out several Snowflake login fields. This article explains what each field represents and where to find the necessary credentials within your Snowflake environment.

Required fields for connecting to Snowflake
Below is a breakdown of the required fields to set up your Snowflake destination in Dataslayer, including where to find each value:
1. AccountYour Snowflake account identifier.
-
Where to find it:
-
Log in to Snowflake and navigate to your Account menu on the left menu.
- In the Account section, select the tab View account details > Account Identifier.
- Copy and paste the Account Identifier appearing there into the Account field in Dataslayer.
-

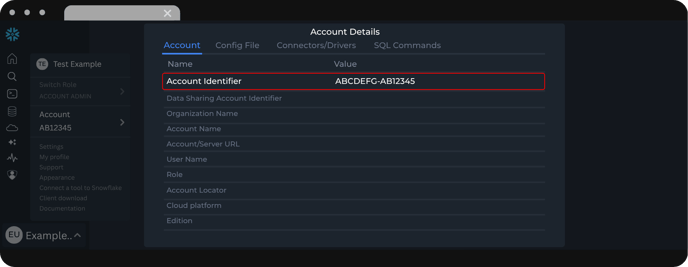
Remain with this View account details tab open, you'll need it for some additional fields!
2. User
The username for the Snowflake account you are using to write data.
-
Where to find it:
-
In the same tab, View account details, look for the field name "User Name".
- Copy and paste the User Name appearing there into the User field in Dataslayer.
-

3. Password
The corresponding password for your user.
4. Database
The name of the target database where you want Dataslayer to write data.
-
Where to find it:
-
In the Snowflake UI, navigate to their left menu and go to the Data section, and click on the Database tab. In there, your databases will be displayed along with their Schemas.
- Enter its name in the Database field in Dataslayer.
-

5. Schema
The schema within the target database where your tables will be created or updated.
-
Where to find it:
-
Open your Database selected on the previous step, then browse to its schema where you want Dataslayer to write data.
- Enter its name in the Schema field in Dataslayer.
-

Optional Fields
These fields are not mandatory, but specifying them can improve control and performance during data transfer.
6. Role (optional)
The Snowflake role assigned to your user governs access permissions.
-
Where to find it:
-
In the tab View account details, look for the field name "Role".
-
Copy and paste the one appearing there into the Role field in Dataslayer.
-

The compute warehouse that will execute the write operations initiated by Dataslayer.
-
Where to find it:
-
In the Snowflake UI, go to Admin > Warehouses in the left-hand menu.
-
There you'll see a list of available warehouses.
-
Select the one you want Dataslayer to use, and copy and paste the name into the Warehouse field in Dataslayer.
-

Important:
-
If you leave this field blank, Snowflake will use the default warehouse assigned to the user (if one exists).
-
If multiple warehouses are configured in your account, it is recommended to explicitly specify which warehouse to use to avoid permission or usage conflicts.
Example Configuration
Here is a sample of a completed configuration:
-
Account:
ABCDFG-AB12345 -
User:
EXAMPLEUSER -
Password:
pS$hX4MñE.QwRD% -
Database:
MARKETING_DB -
Schema:
REPORTS -
Role (optional):
ACCOUNTADMIN - Warehouse (optional):
EXAMPLE_WH

As always, please contact us via our live chat on our website or via email if you still have doubts or questions. We are happy to help!