With this feature, team members can view, edit, and manage shared transfers, ensuring everyone stays aligned and efficient when working with data warehouses like BigQuery, Snowflake, Amazon S3, Amazon Redshift, Google Cloud Storage, and Database destinations.
Why Share Transfers?
Sharing transfers across your team brings several benefits:
- Save time: Avoid recreating the same queries multiple times across team members
- Ensure consistency: Keep everyone working with the same data configurations
- Improve collaboration: Allow teammates to edit and optimize shared queries
- Centralize management: Maintain visibility over who has access to which transfers
- Scale efficiently: Onboard new team members faster by sharing existing transfers
Which Destinations Support Transfer Sharing?
Transfer sharing is available for data warehouse and database destinations that require individual authentication:
Supported destinations:
- BigQuery
- Snowflake
- Amazon S3
- Amazon Redshift
- Google Cloud Storage (GCS)
- Database
How to Share Transfers: Step-by-Step Guide
Follow these simple steps to share your transfers with team members:
1. Log in and Navigate to Your Destination
- Log in to your Dataslayer account at dataslayer.ai
- Open the destination where your transfers are located (e.g., BigQuery, Snowflake, Amazon S3)
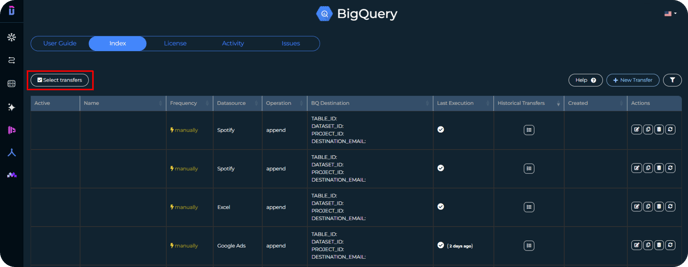
2. Select Transfers to Share
- Click on the Select transfers button in your transfer index
- Check the box next to each transfer you want to share
- You can select one or multiple transfers at once
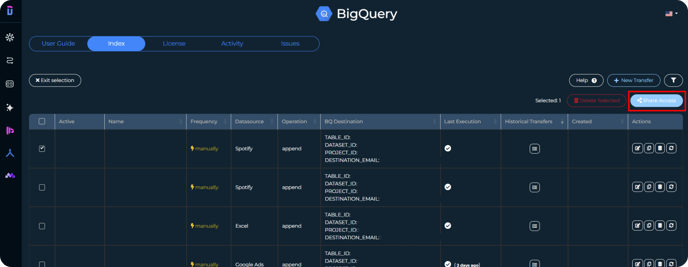
3. Access the Sharing Menu
- Click on the Share access button
- This will open the sharing configuration panel
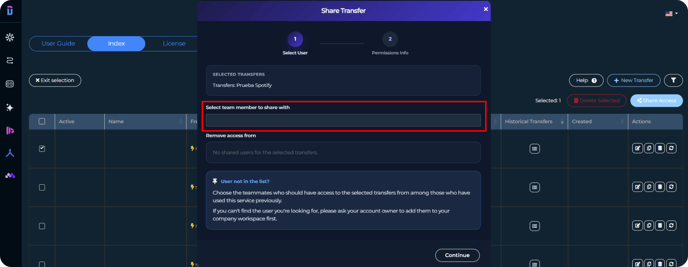
4. Choose Team Members
- Select the teammate(s) from the list who should receive access
- You can select multiple users at once
5. Review and Confirm
- Click Continue to review your selection
- Verify the transfers and users are correct
6. Complete the Sharing Process
- Click the Share button to finalize
- Done! Your teammate will now have access to the shared transfer(s)
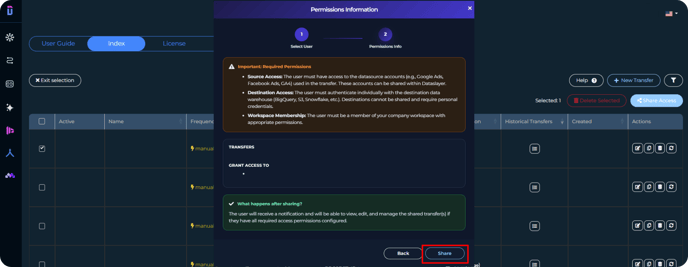
Important: Required Permissions
Before sharing transfers, ensure that your teammates have the necessary permissions. All three requirements below must be met for successful access:
1. Source Access (Data Source Accounts)
The user must have access to the datasource accounts used in the transfer, such as:
- Google Ads accounts
- Facebook Ads accounts
- Google Analytics 4 properties
- LinkedIn Ads accounts
- TikTok Ads accounts
- Any other data source account configured in the transfer
These accounts can be shared within Dataslayer using the Company's Shared Accounts feature.
2. Destination Access (Data Warehouse Credentials)
The user must authenticate individually with the destination data warehouse. Destinations cannot be shared and require personal credentials:
- BigQuery: IAM permissions (Viewer, User, Editor, or Admin role)
- Snowflake: Snowflake account credentials
- Amazon S3: AWS access key and secret
- Amazon Redshift: Cluster credentials
- Google Cloud Storage: GCS bucket permissions
- Database: Database username and password
Each user must set up their own connection to the destination. You cannot share your destination credentials.
3. Company Membership
The user must be a member of your company workspace with appropriate permissions. If the user doesn't appear in the sharing list, ask your account owner to add them to the workspace first.
What Happens After Sharing?
Once you share a transfer, the following occurs:
- Visibility: The shared transfer(s) will appear in the user's transfer index, labeled as "Shared" so they can easily identify them
- Access granted: If all required permissions are configured, the user can immediately:
- View the transfer configuration
- Edit metrics, dimensions, filters, and settings
- Run the transfer manually
- Modify the sync frequency
- See transfer execution history
- Ongoing collaboration: Both you and your teammate can work on the same transfer without conflicts
Troubleshooting: User Not in the List?
If you can't find the user you're looking for when trying to share a transfer, here are the possible reasons:
Reason 1: User Has Never Used This Destination
Solution: The user must log in to Dataslayer and open the specific destination product at least once. Only users who have previously accessed the destination will appear in the sharing list.
Reason 2: User Is Not in Your Company Workspace
Solution: Contact your account owner to add the user to your company workspace. Learn more about company workspaces here.
Reason 3: User Lacks Required Permissions
Solution: Ensure the user has:
- Access to the shared data source accounts (can be granted via Hub)
- Their own authenticated connection to the destination (BigQuery, Snowflake, etc.)
- Appropriate workspace role and permissions
As always, please contact us via our live chat on our website or via email if you still have doubts or questions. We are happy to help!