
To generate queries from the Shopify platform, you must first connect Dataslayer to Shopify. This requires creating and configuring Shopify credentials through the Shopify Developer Dashboard. The process ensures secure authentication and proper access to your store data.
To establish a connection between Dataslayer and Shopify, you will need either a Shopify store owner account, Shopify staff account or partner.
Please, refer to this article for User Permissions.
Authentication Guide: Step by Step
This guide explains how to create and authenticate a Shopify app using the Shopify Developer Dashboard, configure permissions correctly, and obtain the credentials required for API access.
Step 1: Access the Shopify Developer Dashboard
- Go to https://accounts.shopify.com/store-login and proceed with your login.
- In the navigation menu, locate and click on the section App and sales channel settings. Then, click the Develop App button.

- Once in the App Development section, click on Build Apps in Dev Dashboard button.

Step 2: Create a New App
By default, you will see a list of your current apps. To create a new one, click Create app.
Step 3: Define the App Name
Enter a name for your app. This name is internal and can be anything that helps you identify the integration.
Step 4: Select the Distribution Method
If the section Distribution is not available, please follow this guide.
Once the app is created:
-
Go to the Home section of the app (left-hand menu). On the right side, find the Distribution section and click on Select distribution method.

- Select Custom distribution, since this app will not be published in the Shopify App Store.

- A pop-up window will show up to confirm the selection, click on green button Select custom distribution.

- Enter the store name you want to install the app on and click on Generate Link.
There is also a checkbox option. Whether it is enabled or not depends on each client, but leaving it checked is fine and does not affect functionality.
- A new pop-up window will show up to confirm the action, click on green button Generate Link.

Step 5: Create a New App Version to request permissions
-
Back in the DEV Dashboard, go to Versions in the left-hand menu and then click on Create a version for the app.
.png?width=670&height=261&name=Shopify%20Log%20In%20(1).png)
- Copy the URL detailed below and paste it in the URLs box:
- https://query-manager.dataslayer.ai/shopify/init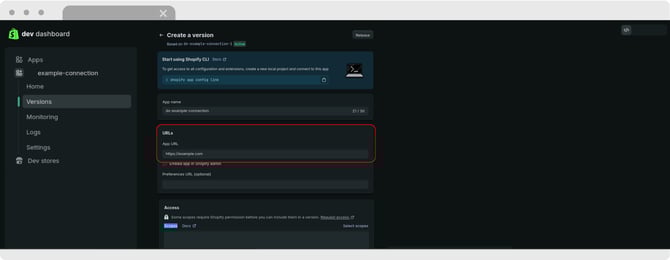
Make sure that the checkbox Embed app in Shopify Admin is not enabled. - Scroll down and copy the 2 URLs below and paste them where it says Redirect URLs:
https://query-manager.dataslayer.ai/shopify/save_token, https://query-manager.dataslayer.ai/shopify/save_token_subscriptions.png?width=670&height=261&name=Shopify%20Log%20In%20(1).png)
- Now, we will need to Request Access to All Orders. Most clients require at least 1 year of historical data, so this step is strongly recommended.
-
Go to the Access section and click “Request access” at the description.

-
On the next site, in the section Read all orders scope, click the Request access button.

-
You will be asked to provide a justification.
For example: “60 days are not useful for analytics.”

-
Once submitted, the request status should show a message such as Your app can access the full order history for a store.

-
If this step is skipped, Shopify limits order data access to only the last 60 days, which is not sufficient for most analytics use cases.
Important
After requesting this permission, reload the Developer Dashboard page.
Otherwise, the read_all_orders scope will not appear in the permissions list.
Step 6: Configure Permissions (Scopes)
- Now, back in the refreshed Dev Dashboard page, you can define the required scopes by navigating to the Access section and clicking on Select Scopes.

These are the permissions needed for full analytics and data extraction:- read_analytics
- read_customers
- read_fulfillments
- read_inventory
- read_orders
- read_products (Required to retrieve product information)
- read_all_orders (Only visible after requesting access in the previous step)
- read_marketing_events (Required for the Marketing Events category)
- Once selected, all the scopes mentioned, click on Done.


Step 7: Release the App Version
Once permissions are configured:
-
Click Release at the top of the page.

- In the pop-up window that will appear, you can leave the fields blank or provide a version name. Then, click on Release.

This makes the version available for installation.
Step 8: Install the App on the Store
-
Go back to the Home in the DEV Dashboard menu.

-
In the Distribution section, click Manage custom install link.

-
Copy and paste the Install Link to be opened in a new tab.

-
You will be redirected to Shopify’s account selector and you'll need to select the Shopify Store. Choose the store name you defined earlier.

Then, click on Install.
Once installed, we can now obtain the credentials we will need to log the Shopify account in Dataslayer.
Step 9: Retrieve Credentials
After installation, you can finally retrieve the credentials needed for authentication:
Go to Settings in the Developer Dashboard menu and locate the following values:
-
Client ID → This is the Client ID required for login.
-
Client Secret → This is the Client Secret required for authentication.
.png?width=670&height=261&name=Shopify%20Log%20In%20(2).png)
Now you have the information needed to make the connection between Shopify and Dataslayer!
Step 10: Log credentials in Dataslayer
- Log in to Dataslayer.ai and look for the Hub Account section.

- Once in there, look for the Shopify connector.

- Click on + Add new account.
.png?width=644&height=354&name=NEW%20UI%202025%20-%20About%20the%20Hub%20%20refresh%20credentials%20(4).png)
- Copy and paste your Client ID and Client Secret into the designated field and input the name of your Shopify store.
.png?width=670&height=261&name=Shopify%20Log%20In%20(3).png)
- Click on Connect once all fields are completed.
.png?width=644&height=250&name=Shopify%20Log%20In%20(5).png)
When specifying your Shopify store name, make sure to use the exact format required: simply input "MYSTORE" without any additional prefixes or suffixes. Avoid using variations like "https://MYSTORE.myshopify.com" or similar formats, as this may lead to connection issues.
Done! The connection has been established and the account can be selected in the Hub Accounts section when building a report.
If you find any issues while making the connection, please refer to this guide.
To extract data from multiple Shopify stores, you will need to repeat the authentication process for each one.
As always, please do not hesitate to contact us via our live chat on our website or via e-mail if you still have doubts or questions. We are happy to help!